
How I Design Spaces and Use Shapr3d

Designing a workspace is an exciting but daunting task. With so many options and possibilities, it can be difficult to know where to begin. In this blog post, I’ll share the process I used to design my studio space from scratch. Before I begin, I want to thank Shapr3D for sponsoring this blog post.
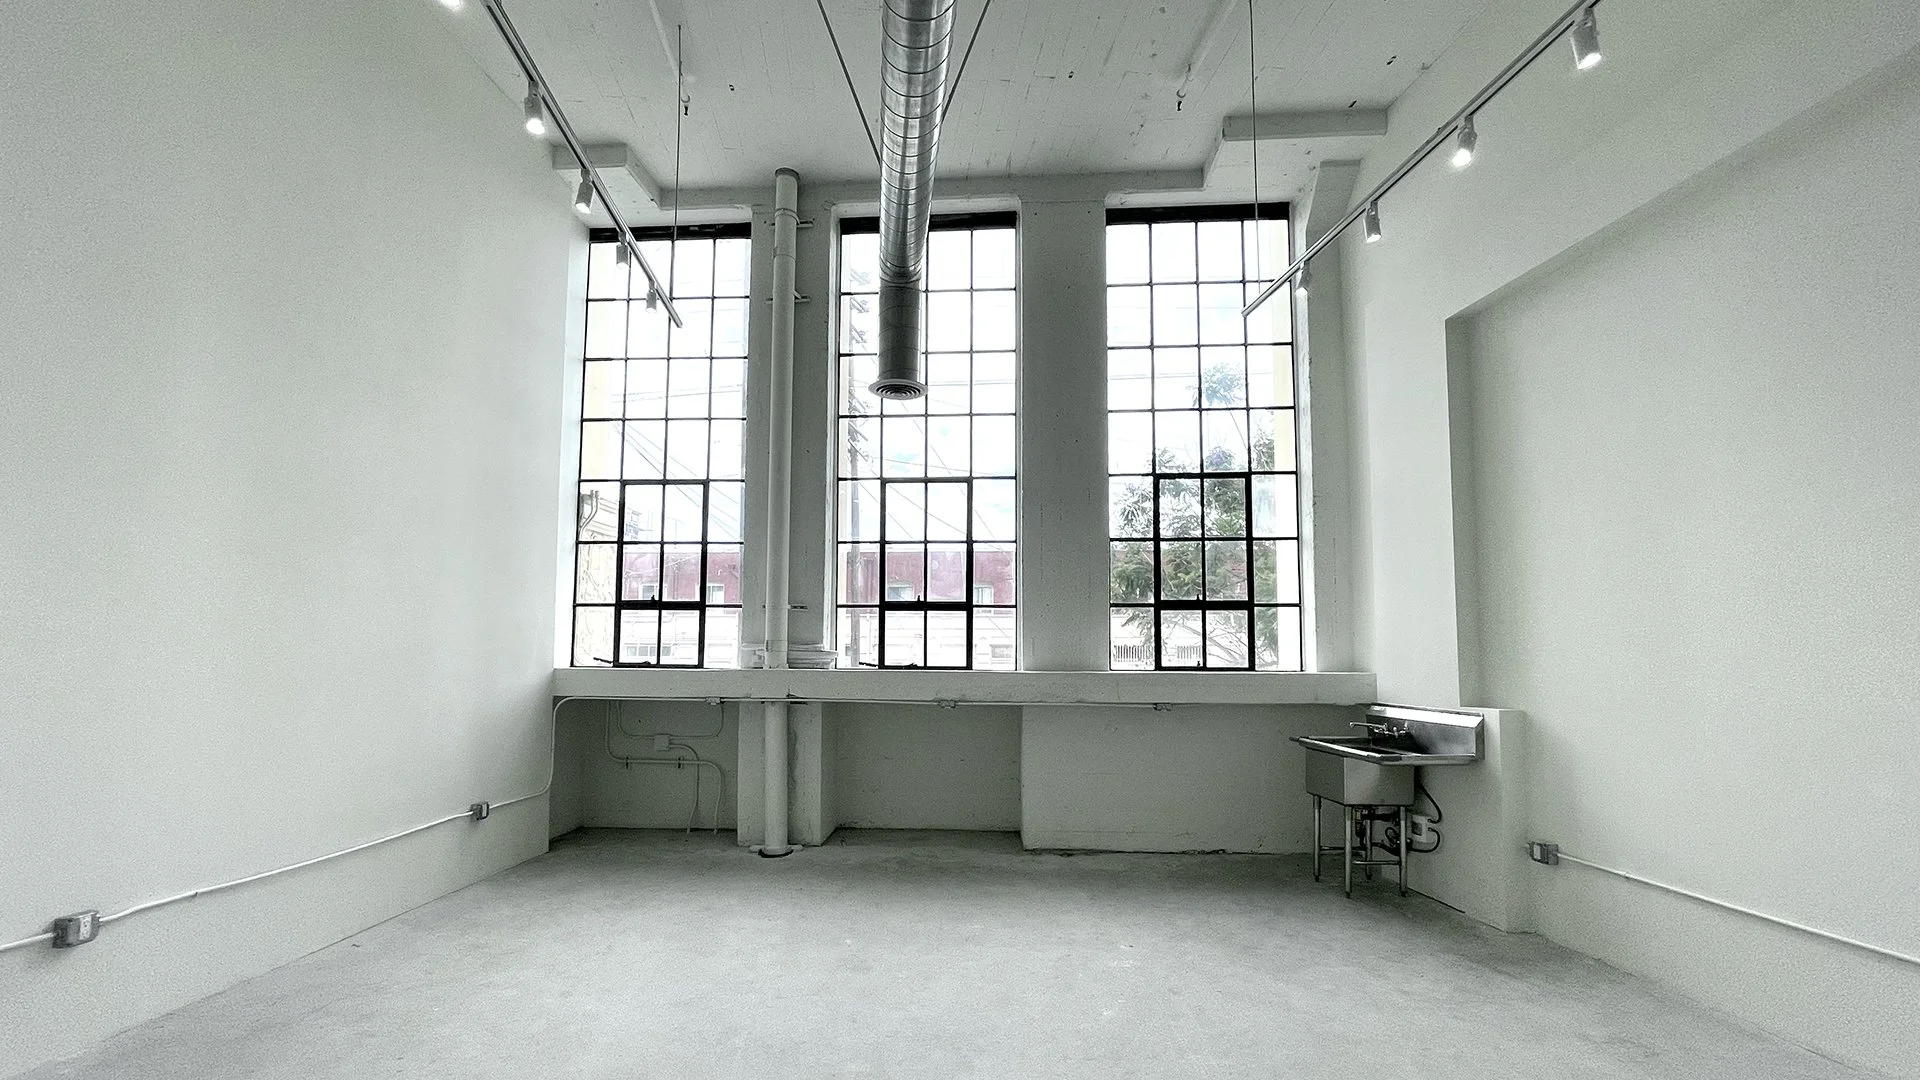

The office: empty (left), 3d render (right)
The Design Process
Whenever I design a new space, I follow these steps, which I’ll break down for you in detail.
Establish the Goals
Create a Vision
Understand Your Constraints
Layout & Idea Exploration
Build it in 3D
Define Details
1. Establish the Goals
What will the space be used for?
Determine the purpose of the space: The first step is to identify the primary purpose of the space you are designing. Understanding the function of the space will help you identify the key design elements that are necessary.
Consider your needs and preferences: It's important to understand the needs and preferences of the people who will be using the space. What tasks do you perform regularly? From that list, can you rank them in order of importance? Are there any specific requirements or requests that need to be taken into account?
Answering these questions in as much detail as possible will help you have a clear north star for your project to keep you focused. Without a clear goal, it’s impossible to know if your idea is good or bad. Having a direction will help you make all of your decisions from layout to decor.
The goals and needs for my studio are to:
Have 2 desks to work on.
A dedicated area to build things in.
And I need tons of storage for my camera gear, tech, and tools.
Additionally, the whole office should be photogenic, so I have multiple backdrops for filming content.
Because the projects I work on always change, I need the layout to be flexible.
And lastly, I want a small lounge area to relax, think, and have a nice cup of coffee.
2. Create a Vision
What can the space look and feel like?
Define a style: Based on the purpose of the space, you can start to define a style for the interior design. Consider your preferences. There are many different styles to choose from, such as traditional, modern, transitional, and eclectic. The style you choose will inform your choice of colors, patterns, and textures.
The easiest way to start exploring looks is to create curated mood boards that capture the essence of your vision. You can start by looking through Pinterest or publications like Dwell for inspiration and collect them in one place.
Once you’ve exhausted your search and have found good inspiration, now comes the time to edit down your selections, filtered through your goal. By the end, you should have a tight mood board with a clear theme and style that will serve as a guide in your design and decorative process. Curating is key–the better your input (references), the better the output (your design).
Final mood board for my studio concept.
My concept for the studio: The zen workshop.
A calm and creative space that balances a minimal office aesthetic with a hard-wearing workshop. Designed as a modular open space, filled with bright light, and natural materials.
3. Understand Your Constraints
What limitations are you working within?
Measure and analyze the space: Before beginning the layout design process, it's important to analyze the space and understand its size, shape, and features. This includes taking measurements, noting any architectural features such as columns or windows, and identifying any existing furniture or fixtures that need to be incorporated into the design.
Identify design challenges: Every interior design project comes with its unique challenges. These may include limited space, unusual architectural features, or a need to incorporate specific elements such as natural light or storage. Identifying these challenges early on will help you develop a plan to overcome them.
Establish a budget: Determine the budget for the project. This will help you determine the scope of the project and the materials and furnishings you can afford to use. Going back to your prioritized goals from step one may help you decide where to focus your funds.
An example of a constraint in my space: One of the walls has unusual cavities built underneath its windows. So this area would be great for creating a custom cabinet storage system for my camera gear, tech, and miscellaneous things I need for work.


This area of my office had an unusual cavity under the windows, so I designed custom cabinets to make the most of the space.
4. Layout & Idea Exploration
What are the major areas of your space?
What are the components that will make them up?
Establishing a focal point: The layout design should include a focal point, such as a piece of furniture or an architectural feature, that draws the eye and anchors the space.
Creating zones: Once the focal point is established, the space can be divided into zones based on its purpose and how it will be used. For example, an office can have desks for computers, workbenches for building, various storage areas, a lounge area for relaxing, and a coffee bar for refreshments.
Planning the furniture layout: With the zones identified, the furniture layout can be planned. This involves determining the placement of furniture and ensuring that there is enough space for people to move around comfortably. It's important to consider factors such as traffic flow, functionality, and visual balance when planning the furniture layout.

The layout and idea exploration process for my studio.
With a design direction established, I roughed out a few potential layouts based on the measurements of the space. In this layout phase, I block out sections, trying to figure out which configuration has the best flow and makes the best use of the space.
I usually take it a step further and sketch out ideas for potential solutions and furniture, as my mind is in problem-solving mode.
I find working with paper and pencil is the best place to start. You can iterate quickly because the sketches don’t feel precious, and you can explore a lot in a short amount of time. A tip: I like using grid paper because it helps me sketch accurately, especially when drawing floor plans. I assign one grid box to represent one square foot, but you can use any unit you like.
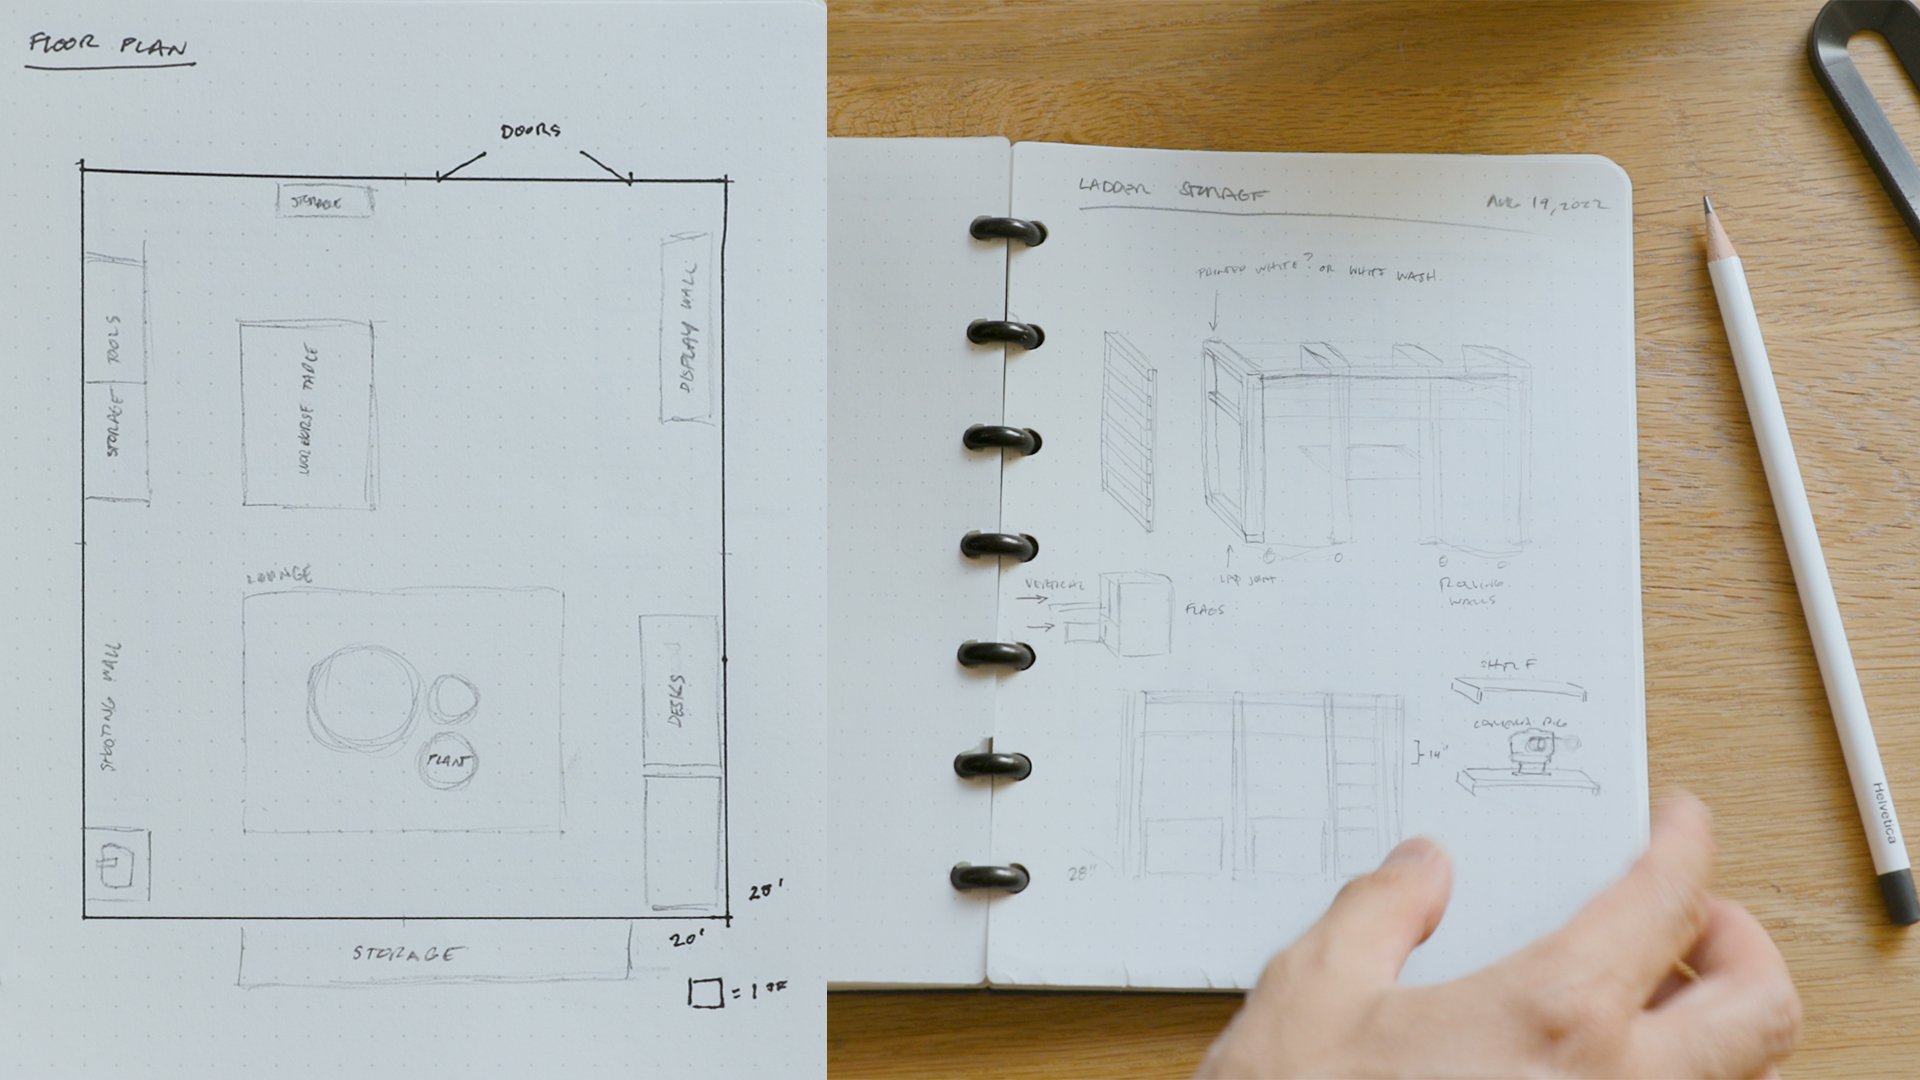
From my sketchbook: Floor plan (left) and furniture ideas (right) start in my sketchbook.
5. Build it in 3D
Build your space and explore ideas in 3d: Once you have some rough sketches in 2d, you can continue your “sketches” in 3d, to test your ideas, and finalize your designs. This will give you a better sense if your layout flows, where things feel crowded, and can help you better visualize your ideas in an accurate 3d space, than if you were just sketching this alone.
I used the Shapr3D App to create the layout of my space, as well as the custom furniture I built. It’s a 3D CAD modeling software that works well on desktop and iPad, and is very simple to learn and use, because of its intuitive design. Download Shapr3D for iPad, MacOS and Windows: https://bit.ly/3CcFFkg. Use ModMusings10 for 10% off.
Create your floor plan: First create the room(s) using a 2d sketch and/or measurements you’ve taken from the space. There’s a fantastic tutorial from the Shapr3D team that walks you through step-by-step of this process, which I followed for my own office.
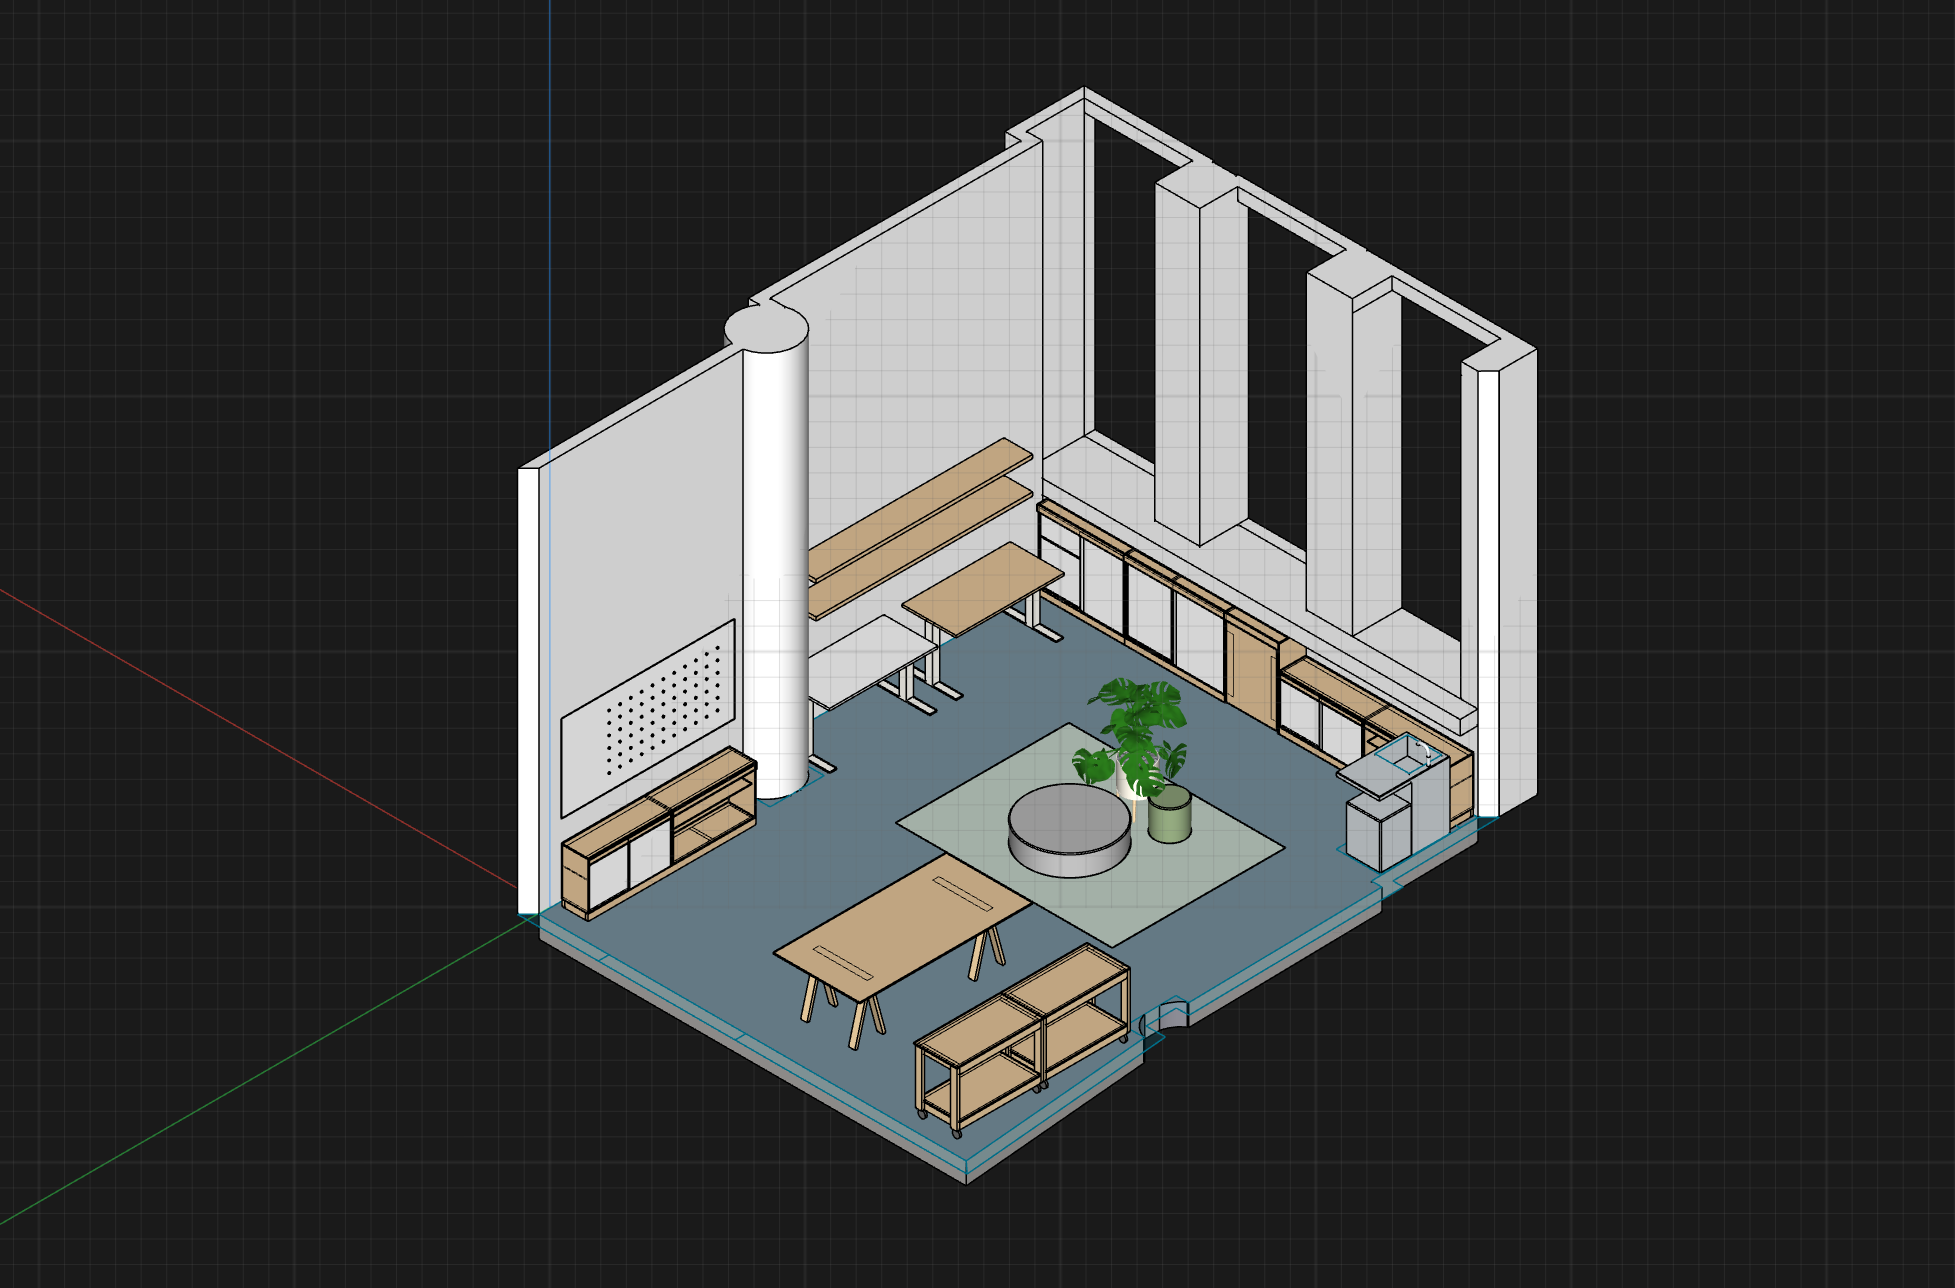
Start with blocks: Once you have your rooms established, you can begin to block out your zones with furniture, using simple shapes like boxes. These are fast to make, and will help you check general dimensions of the objects in the space, to feel it out.

Early screenshot of the 3d blocking process.
Use a human model for scale: One thing I’ve found useful I’m the 3d process is to drop in a human model or box that represents your height. That way you can get a relative sense if surfaces and shelving will be accessible and comfortable to you. You can easily find a free model from CGtrader or Turbosquid, and scale it to size.
6. Define the Details
Define the final details before purchasing, building, and furnishing your space.
Adding in furniture: Once you’ve established a good layout for your space, you can begin to refine the details with the exact objects (and their measurements) in your space. That way, you’ll have a clear idea of what to buy, what to build, and how they all fit together in your place.
You can typically find models online for the most popular furniture brands with a quick Google search. Some furniture companies, like Bludot, allow you to download accurate models of their furniture for free. For other furniture, you may have to build in 3d yourself, which I do often.
Bespoke Furniture: Sometimes, you need custom solutions for furniture that can’t be found off the shelf. This is where the power of a CAD tool like Shapr3D really shines. Because I have a little experience with woodworking, I try to build custom furniture and solutions to suit my space and needs perfectly.
Here are a few reasons why Shapr3D is an excellent tool for designing furniture:
Intuitive and User-Friendly Interface: The app has a simple and user-friendly interface and workflows that allow designers to easily create complex 3D models.
Precise Measurements: Shapr3D offers precise measurements that are accurate to the hundredth of a millimeter, making it easy to create furniture pieces that fit perfectly in any space.
Mobile: Seamlessly switch between desktop and iPad, and take your projects on the go.
Shapr3D Cloud - Your designs, backed up securely, synced to any of your devices and making sharing as easy as sending a link
Integration with other software: Shapr3D can export designs in several different file formats, making it easy to collaborate with other designers or to export designs for production using other software.
My office model, a screenshot from Shapr3d.
Selecting materials and finishes: The materials and finishes used in the space should be selected based on the purpose of the space and the desired aesthetic that you established earlier in the process. This includes flooring, wall finishes, and furniture materials.
You can usually get swatch samples from shops to help you visualize what it will all look like together. Alternatively, you can take the 3d model you’ve created and create 3d renderings of the space in other software or hire someone to do it for you.
For my studio, I chose soft white paint for the walls and polished concrete flooring. For my furniture, I used white oak as my primary material and used accents of green (plants) and black (objects). I utilized swatches and 3d rendering to help me finalize my plans for the space.


3D renders of the designed office.
Begin the Build
Designing a space from scratch is no easy task, but following the steps in this article should help you move confidently into your build phase and create the workspace of your dreams.
I want to thank Shapr3d again for sponsoring this blog post.
Download Shapr3D for iPad, MacOS and Windows: https://bit.ly/3CcFFkg.
Use ModMusings10 for 10% off.